
Overviews
From the CentOS8 Practical Guide. In this article, I will give an overview of CentOS and its implementation. For an overview of Linux, please refer to “Linux Overview“.

CentoOS (Community Enterprise Operating System) is a clone OS that maintains high compatibility with Red Hat’s commercial Linux distribution, RHEL (Red Hat Enterprise Linux). Red Hat and the community have collaborated to develop it, and as an open source OS available free of charge, it is used in a wide range of applications. In particular, it has recently been used in a variety of applications, including scale-out analysis platforms such as Hadoop, knowledge information processing platforms such as AI, machine learning, and deep learning, software-defined distributed storage platforms, HPC (High Performance Computing) platforms, and container platforms.
The OS installation procedure is described below.
Precautions before installation
When installing an OS, not limited to CentOS, on an x86 server, it is necessary to complete hardware configuration for the intended operations. In recent years, the amount of memory and disk space that can be installed in an x86 server has been rapidly increasing, and if no advance preparation is made on the hardware side, the purchased hardware may not be able to fully demonstrate its functions and performance. This is especially important when using huge memory space in database servers and in-memory analysis platforms.
In recent years, x86 servers equipped with both BIOS and UEFI have been on the rise, but when combining an x86 server with external storage, it is necessary to investigate the support requirements for either BIOS or UEFI support, in addition to confirming the operation with CentoOS8. For example, Fibre Channel (FC) For example, when connecting Fibre Channel (FC) storage to a server, the vendor determines whether the server will support BIOS or UEFI mode.
installation media
When installing CentoOS on a physical server’s internal hard disk or SSD, boot from DVD media that contains a bootable iso image for installation. iso images are used for normal server and workstation applications. In addition to DVDiso, there is also boot iso, which is used to access the CentOS community repository via the Internet to download packages and install the OS.
CentOS installation media is provided as an iso image from the CentOS Community download site. As a communication route, you may use a mirror site other than the original site provided by the CentOS community.
CentoOS Installer
The CentOS installer combines both the GUI mode installer and text mode to the installer. the first step of the CentoOS installation screen displays the following three items
- Install CentoOS Linux : Install CentoOS
- Test this media & install CentoOS Linux : Test the DVD media before installation
- Troubleshooting : Installation with VESA, rescue mode, memory test, etc.
After selecting Install CentoOS Linux in normal installation mode from the menu screen, press the “TAB” key with the cursor aligned with the up/down arrow on Install CentoOS Linux in basic graphics mode to display the boot parameters on the bottom line of the screen. The boot parameters will be displayed. You can give your own boot parameters by keyboard input on the command line where the boot parameters are displayed.
GUI mode installation
The following describes the installation of an OS using GUI mode.
First, enter the overview screen of the OS installation. The overview screen is largely divided into regional settings, software, and system settings.
Regional settings include keyboard, language, time, and date. For the keyboard, select the keyboard layout to be used for the system. If you plan to perform remote operations, you will need to take care to change the keyboard layout to that of the client PC.
Next, on the Language Support screen, select the language you wish to install the software in, and set the time and date.
Installation Source Configuration
In the Installation Source section, select where you want to install CentOS from: If you are using DVD, the CentOS DVD media attached to the physical DVD drive connected to the server will be displayed. Click “Finish” to return to the installation summary screen.
You can also click “Confirm” to check if the CentOS media is appropriate.
In the CentoOS Installation Source screen, AppStream is selected as the data repository. If necessary, AppStream can be selected or removed. You can also register your own custom repositories in the vehicle at this stage. Even if the custom repository is not yet ready, the information can be entered at this point and the repository itself can be registered with the checkbox under “Additional Repositories” unchecked so that the repository itself is disabled and can be set up later.
When you have finished entering all the information, click on the “Done” button in the upper left corner of the screen to return to the Installation Summary screen.
Select Software
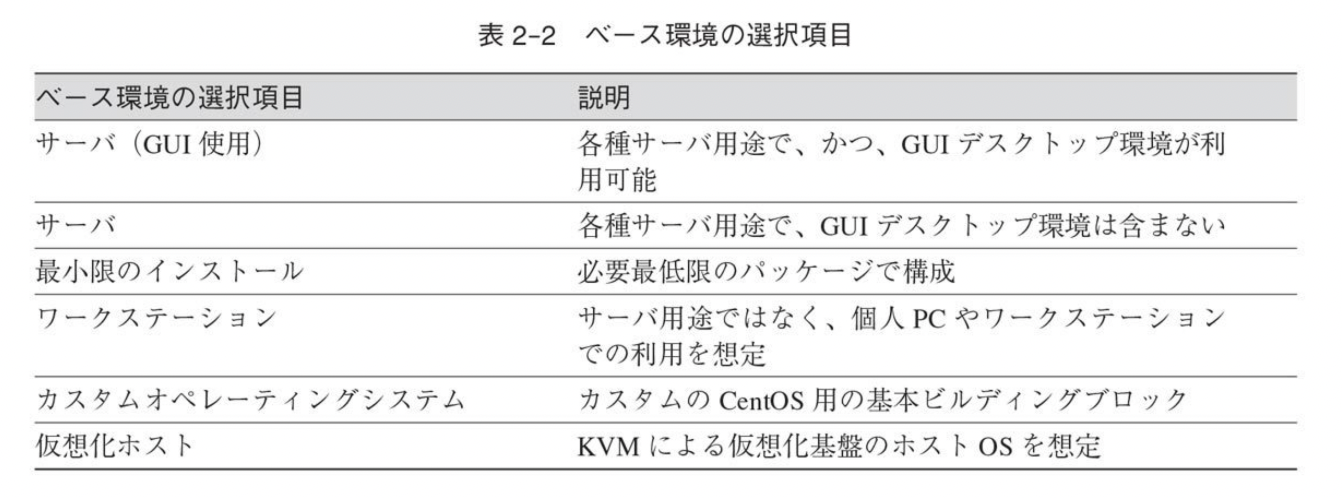
The software selection screen allows the user to select a base environment and associated add-on software. Six types of base environments are available, as shown below.


ソフトウェアの選択画面でも、各ベース環境に対する選択可能なアドオンは以下のようになる。


The meaning of the above add-ons is given below.


If you are building a server, which software selections you choose depends on your purpose. If you want to manage the server locally with GUI tools, you can select “Server (GUI use)” which includes GNOME desktop and additional add-ons. However, for command line operation without a keyboard, mouse, or display connected, web front-end servers that do not include X Window, or guest OS image files that serve as templates for virtual machines in virtual environments or cloud machines, you should select the “minimal installation” option as the software. In some cases, a “minimal installation” may be selected as the software.
The packages installed on the actual system are highly dependent on the system requirements, so the base environment and add-on packages selected by the installer are never complete. Although system requirements may be ambiguous, from a security perspective, if you do not want to install unnecessary packages, it is better to do a minimal installation and install only what is needed additionally after the OS is installed. If the environment does not have many security concerns and you want to develop a development environment for graphic design and software developers, a workstation is a good choice.
When all entries are complete, click “Finish” in the upper left corner of the screen to return to the Installation Summary screen.
Destination Settings
On the installation destination setting screen, select the internal disk where CentOS will be installed and set the partition. Normally, the installation will be performed on the server’s internal disk, so if the internal disk is successfully recognized, the local standard disk will be visible. At this point, if no devices are visible on the local standard disk, the logical devices created on the server’s RAID controller must be rerecognized.
Click on the internal disk where the OS will be installed, and a check mark will appear. If a check mark appears, the local disk is considered ready for partitioning. If you do not want to install the OS, click again to remove the check mark.
Manual Partitioning
After selecting Custom in Storage Settings and clicking “Done” in the upper left corner of the screen, the Manual Partition Setup screen will appear. The manual partitioning screen allows the user to select one of the three partitioning schemes shown below.


In CentOS6, partitioning was seen in standard partitions and LVM, but in CentOS7 and 8, LVM thin provisioning is supported, allowing for highly flexible OS operation and management. Specifically, it is now possible to obtain multiple snapshots, which record the current state of the OS, and the OS can always detect writes and allocate actual data blocks only for the amount that has changed.
This mechanism enables the storage of multiple generations of snapshots, which can be restored to the point in time when the snapshots were taken, making it possible to restore data from the snapshots taken in the event of data loss. LVM thin provisioning is recommended for operational efficiency.
Once LVM thin provisioning is selected as the storage configuration scheme, partitions are created on the disks. Although partition settings vary depending on the line-based system being used, the following is an example of partition allocation and usage for a 3TB internal disk on an x86 server (BIOS mode) with 64GB of physical memory on CentOS8.


The first step is to create a BIOS Boot partition, which is required when rebooting an OS from a GPT partition larger than 3TB on a machine with BIOS. To create the partition, click on the “+” in the lower left corner of the screen. The BIOS Boot partition should have a capacity of 1 MiB.
Next, create the /b00t partition. To create the partition, click the “+” button in the lower left corner of the screen as before. For the /boot partition, enter /boot as the mount point. After entering the capacity of /boot, click “Add Mount Point”.
The device type for /boot should be set to standard partition, but the / partition and /home partition can be set to LVM thin provisioning.
For /boot, /, and /home, select XFS file system this time. After changing the device type (standard partition, LVM thin provisioning, etc.) from the device type pull-down menu, click “Change Settings” at the bottom right of the screen. For standard partitions, encryption is enabled by checking the encryption checkbox. In addition, select luks2 for the LIKS version on the far right of the screen.
For file system (F/S), besides XFS, BISO Boot, ext2, xt3, ext4, and vfat can be selected, but XFS should be selected as the file system except for BIOS Boot and swap partition. After selecting XFS from the file system pull-down menu, click “Update Settings” in the lower right corner of the screen.
After setting the above, click “Finish” in the upper left corner of the screen to display the “Summary of Changes” screen regarding disk formatting, and click “Allow Changes” to return to the “Installation Summary” screen.
Network and Host Name Settings
The Network and Host Name settings include the IP address and gateway address to be assigned to the NIC, the IP address of the DNS to be referenced, and the host name. Enter the host name including the domain name in the host name entry field in the lower left corner of the screen and click “Apply” to display the recognized NICs.
Select a NIC from the list and click “Configure” at the bottom right of the screen. The screen for editing the parameters of the recognized NICs will then be displayed, allowing the user to enable the NIC at boot time and to set the IP address, default gateway, and DNS server IP address.
Network Settings
Check the “Preferential Auto-Connect” checkbox so that the NIC is automatically enabled when the server starts. Next, click on the “Ethetnet” tab and check the device name displayed in the Device column. In some server environments, the IP packet size, called MTU (Maximum Transmission Unit), may be explicitly specified. If the recommended MTU value is determined by the application, set it here. Normally, it should be set to automatic.
Regardless of the type of wireless or wired LAN, authentication can be enabled for network connections. User authentication with 802.1x may be set when allowing connections to very sensitive systems. Based on security requirements, user names and passwords in 802.1x can be configured.
DCB is an extension plan for 10GbE standardized by IEEE that enables data transfer over Ethernet using protocols such as Fibre Channel and SCSI. FC Plotocol communication over Ethernet is called FCoE, and SCSI protocol communication is called iSCSI. NICs that can handle these are commonly called DCB-compatible NICs. These can be configured by checking the checkboxes on the DCB configuration screen.
After setting the proxy, IPv4, and IPv6 settings, all the settings in the “Installation Overview” are complete, and then click “Start Installation” to start the CentOS installation.
While CentOS installation is in progress, root user password and “Create User” can be set as “User Settings”.


AIシステム設計・意思決定構造の設計を専門としています。
Ontology・DSL・Behavior Treeによる判断の外部化、マルチエージェント構築に取り組んでいます。
Specialized in AI system design and decision-making architecture.
Focused on externalizing decision logic using Ontology, DSL, and Behavior Trees, and building multi-agent systems.


コメント