From “Microservice with Clojure. In the previous article, we discussed the use of ElasticStash for monitoring microservice system operations. In this article, we will discuss Docker and Kubernetes for deployment and operation of microservices.
Scale microservice deployments
Microservices need to be packaged as self-contained artifacts that can be replicated and deployed with a single command. The service also needs to have a short startup time and be lightweight so that it can be up and running within seconds. Containers can be deployed quickly due to their inherent implementation compared to setting up a bare-metal machine with a host OS and the necessary dependencies. In addition, packaging microservices within containers allows for a faster and more automated transition from development to production. Therefore, it is recommended that microservices be packaged in containers.
About Containers and Docker
Linux Containers (LXC) will be an OS-level virtualization method that allows multiple isolated Linux systems, also called containers, to run on a single host OS using a singleLinux kernel. It uses cgroups, which do not require virtual machines, to share resources among containers. Since each container depends on the Linux Kernel of the host OS already running, startup time is greatly reduced compared to virtual machines running on Hypervisor.
Docker also provides resource isolation for containers with Linux cgroups, kernel namespaces, and union mount options to help avoid the overhead of starting and maintaining virtual machines. By using Docker containers for microservices, the entire service and its dependencies can be packaged inside a container and run on any Linux server.
Setting up Docker
The easiest way to set up Docker is to use the setup scripts provided by Docker in the community version, as shown below. script provided by Docker in its community version as follows
> wget -qO- https://get.docker.com/ | sh
The above command sets up Docker based on the host operating system; Docker also provides pre-built packages for all common operating systems in its download section. Once the installation is complete, add the current user to the docker group as follows
> sudo usermod -aG docker $USER
A new login session may need to be started to account for group membership. That’s it, you can start Docker; to test Docker, list the running containers with the following command
> docker ps -a
CONTAINER ID IMAGE COMMAND CREATED STATUS PORTS NAMES
Since there are no running containers, only headers are listed. To test the execution of a container, use the docker run command as in the following example: download the hello-world Docker image and run it on the container.
> docker run hello-world
Unable to find image 'hello-world:latest' locally
latest: Pulling from library/hello-world
ca4f61b1923c: Pull complete
Digest: sha256:66ef312bbac49c39a89aa9bcc3cb4f3c9e7de3788c944158df3ee0176d32b751 Status: Downloaded newer image for hello-world:latest
Hello from Docker!
This message shows that your installation appears to be working correctly.
To generate this message, Docker took the following steps:
 1. The Docker client contacted the Docker daemon.
 2. The Docker daemon pulled the "hello-world" image from the Docker Hub.
    (amd64)
 3. The Docker daemon created a new container from that image which runs
the
    executable that produces the output you are currently reading.
 4. The Docker daemon streamed that output to the Docker client, which sent
it
    to your terminal.
To try something more ambitious, you can run an Ubuntu container with:
> docker run -it ubuntu bash
 Share images, automate workflows, and more with a free Docker ID:
 https://cloud.docker.com/
 For more examples and ideas, visit:
 https://docs.docker.com/engine/userguide/
The preceding command would download the hello-world image, save it locally, and then execute it in the container. Since the hello-world image is being used for the first time, it does not exist on the local machine, so the docker command first downloads it from the remote Docker Registry. Running the same command again, this time the image is found on the local machine and is ready to be used, as in the following example. In this case, as before, you will only see a message and installation instructions output as a result of running the hello-world image.
> docker run hello-world
Hello from Docker!
This message shows that your installation appears to be working correctly.
To generate this message, Docker took the following steps:
1. The Docker client contacted the Docker daemon.
2. The Docker daemon pulled the "hello-world" image from the Docker Hub.
(amd64)
3. The Docker daemon created a new container from that image which runs
the
executable that produces the output you are currently reading.
4. The Docker daemon streamed that output to the Docker client, which sent
it
to your terminal.
To try something more ambitious, you can run an Ubuntu container with:
> docker run -it ubuntu bash
Share images, automate workflows, and more with a free Docker ID:
To list the Docker images available on the local machine, run the docker images command as in the following example
> docker images
REPOSITORY TAG IMAGE ID CREATED SIZE
hello-world latest f2a91732366c 7 weeks ago 1.85 kB
Similarly, to list the created Docker containers, use the docker ps -a command as before. This time, containers launched using the hello-world image will be listed like this.
> docker ps -a
CONTAINER ID IMAGE COMMAND CREATED STATUS PORTS NAMES
e0e5678ef80a hello-world "/hello" 5 minutes ago Exited (0) 5 minutes ago
happy_rosalind
ea9815d87660 hello-world "/hello" 8 minutes ago Exited (0) 8 minutes ago
fervent_engelbart
The Helping Hands service created previously has a Dockerfile created as part of the project template. For example, looking at the directory structure of the Auth service shown in the following example, to run within a Docker container, the ::http/host key of the service definition in the helping- hands.auth.service namespace must be set to a fixed IP address or 0.0.0.0 and bind to all available IPv4 addresses in the container.
Change the contents of the Dockerfile for the Auth service as shown in the example below, where both the config directory and the standalone JAR file for Helping Hands’ Auth service are copied. If the standalone JAR is not present in the target folder, create it using the lein uberjar command, which creates the standalone JAR in the target directory of the Auth project.
Next, the docker build command is used to create a Docker image, as shown in the following example. docker build command looks for a Dockerfile in the same directory as the directory from which it was launched. If the Dockerfile is located elsewhere, the The path to the Dockerfile can be specified explicitly; see usage for more information on the docker build command.
# build the docker image
   % docker build -t helping-hands/auth:0.0.1 .
   Sending build context to Docker daemon 48.44 MB
Step 1/6 : FROM java:8-alpine
8-alpine: Pulling from library/java
709515475419: Pull complete
38a1c0aaa6fd: Pull complete
5b58c996e33e: Pull complete
Digest: sha256:d49bf8c44670834d3dade17f8b84d709e7db47f1887f671a0e098bafa9bae49f Status: Downloaded newer image for java:8-alpine
    ---> 3fd9dd82815c
   Step 2/6 : MAINTAINER Helping Hands <helpinghands@hh.com>
    ---> Running in dd79676d69a4
    ---> 359095b88f32
   Removing intermediate container dd79676d69a4
   Step 3/6 : COPY target/helping-hands-auth-0.0.1-SNAPSHOT-standalone.jar
   /helping-hands/app.jar
    ---> 952111f1c330
   Removing intermediate container 888323c4cc30
   Step 4/6 : COPY config/conf.edn /helping-hands/
    ---> 3c43dfd4af83
   Removing intermediate container 028df1e03d58
   Step 5/6 : EXPOSE 8080
    ---> Running in 8cf6c15cab9f
    ---> e79d993e2c67
   Removing intermediate container 8cf6c15cab9f
   Step 6/6 : CMD exec java -Dconf=/helping-hands/conf.edn -jar /helping-
   hands/app.jar
    ---> Running in 0b4549cf84f2
    ---> f8c9a7e746f3
   Removing intermediate container 0b4549cf84f2
   Successfully built f8c9a7e746f3
   # list the images to make sure it is available
   % docker images
REPOSITORY TAG IMAGE ID CREATED SIZE
   helping-hands/auth 0.0.1 f8c9a7e746f3 17 seconds ago 174 MB
   hello-world latest f2a91732366c 7 weeks ago 1.85 kB
   java 8-alpine 3fd9dd82815c 10 months ago 145 MB
Once an image is created and registered with the specified name and tags, a new container can be created from the same image in this manner.
# create a new container from the tagged image
   % docker run -d -p 8080:8080 --name hh_auth_01 helping-hands/auth:0.0.1
   286f21a088dd8b6b6d814f1fb5e4d27a59f46b6d8c474160628ffe72d3de2b56
   # verify that the container is running
% docker ps -a
   CONTAINER ID IMAGE COMMAND CREATED STATUS PORTS NAMES
286f21a088dd helping-hands/auth:0.0.1 "/bin/sh -c 'exec ..." 5 seconds ago Up 3 seconds 0.0.0.0:8080->8080/tcp hh_auth_01
e0e5678ef80a hello-world "/hello" 51 minutes ago Exited (0) 50 minutes ago happy_rosalind
   ea9815d87660 hello-world "/hello" 54 minutes ago Exited (0) 53 minutes ago
   fervent_engelbart
Check the log messages generated by Docker to confirm that the Auth service is running, as shown here.
As shown in the following example, the Auth service will be directly accessible on port 8080. This port is mapped using the -p flag in the docker run command, as used during container creation.
Containerizing the services of the Helping Hands application allows for rapid deployment to multiple machines, but its scaling requires manual intervention and the involvement of the DevOps team to scale up and down. Also, monitoring all running containers can become burdensome over time, as the service may scale to hundreds of instances running containers across a cluster of machines. Alerts can be sent to the team when a service or container fails, but running them manually can be a tedious task. Furthermore, manually estimating and achieving effective resource utilization and optimally balancing the number of running instances of each service is exhaustive and often error-prone.
To avoid such manual work and to ensure that a configured number of services are always running and making the best use of available resources, a container orchestration engine is needed Kubernetes is one such open source container orchestration engine that can be used to widely used for automated deployment, scaling, and management of containerized applications such as mutual aid application services.
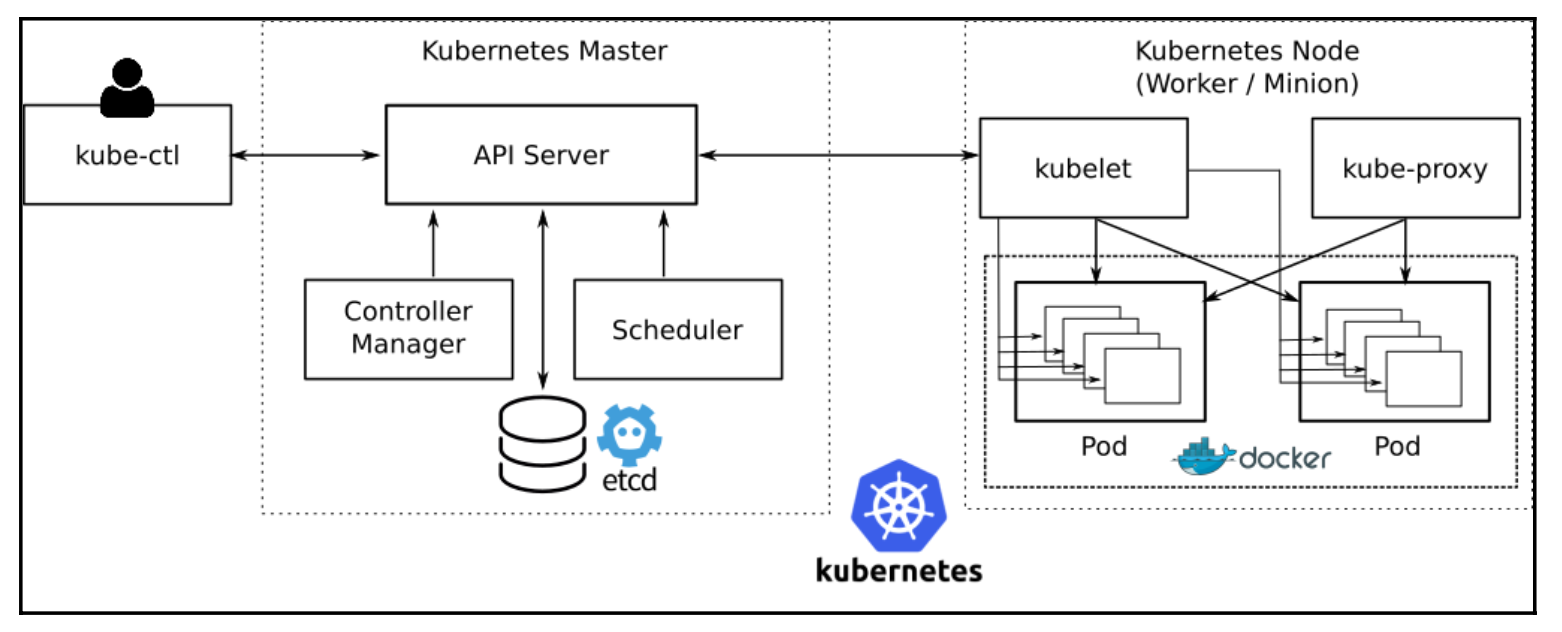
In Kubernetes deployment, there are two types of machines: Master and Node (formerly called Minions) The Master instance is the brain of the Kubernetes engine, making all decisions regarding container deployment and responding to various events such as failures, new allocation requests, and various other events. The Master instance runs kube-apiserver, etcd, kube-controller- manager, and kube- scheduler. It also runs kube-proxy to run in the same overlay network as the Nodes; it is recommended that the Master be run on a separate machine dedicated solely to cluster management tasks.
Nodes, on the other hand, are worker machines in a Kubernetes cluster and run Pod, which are the smallest units of computing that can be created and managed in a Kubernetes cluster. It can be a group of one or more containers that share networking, storage, and a common set of specifications. Each Node runs Docker services, kubelet and kube-proxy, and is managed by a master component. kubelet agent runs on each Node, manages Pods assigned to the Node, and reports Pod status to the Kubernetes reports to the cluster.
Kubernetes has built-in support for Docker containers. The services of automatic bin packing to make the best use of resources, horizontal scaling to scale services up and down, and automatic container restart on failure with self-healing based on factors such as CPU utilization are still provided by Kubernetes.
Kubernetes also supports Service Discovery and load balancing by assigning containers their own IP addresses. It also assigns a common DNS name to a group of containers so that other external services only need to know the DNS name and can access the service using the same one; Kubernetes will then balance requests between services running in containers that are registered in the DNS with the specified name by internally balanced. Rolling upgrades are also provided by Kubernetes by incrementally upgrading containers to new ones. All updates are versioned by Kubernetes and can be rolled back to any previous stable version.
Getting Started with Kubernetes
The simplest way to get started with Kubernetes and run it locally on a single machine would be to use Minikube.
The preceding command will download the latest release of the Minikube script and copy it to the /usr/local/bin directory so that it is available on the path. Minikube also requires kube-ctl to interact with the Kubernetes cluster; to set up kube-ctl, use the kube-ctl installation script as follows
# download kube-ctl script
   % curl -LO https://storage.googleapis.com/kubernetes-release/release/$(curl
   -s
   https://storage.googleapis.com/kubernetes-release/release/stable.txt)/bin/l
   inux/amd64/kubectl
   # make the script executable
   % chmod +x ./kubectl
   # make it available on the path
   % sudo mv ./kubectl /usr/local/bin/kubectl
See the Minikube project documentation for details on how to create a Kubernetes cluster using the minikube command, interact with the master using kube-ctl, and deploy containers.

 cloud.docker.com
For more examples and ideas, visit:
cloud.docker.com
For more examples and ideas, visit:

 docs.docker.com

コメント