From “Introduction to Apache Spark”. In the previous article, we discussed the distributed data processing model of Apache Spark. In this article, we will discuss how to prepare the environment in which Spark runs.
Spark is designed to run on a cluster. However, if you want to check the behavior of an application you are creating or perform functional tests, it is possible to run spark on a single machine, as building a cluster environment is a large and troublesome undertaking. In this article, we first describe how to build an environment on a single machine, and then describe the procedure for building a cluster environment.
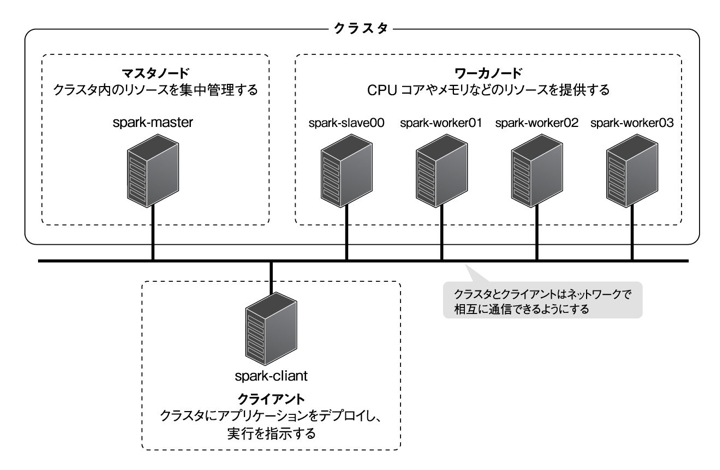
Machine Configuration
spark-client : machine acting as a client, responsible for deploying applications to the cluster and directing their execution (only use this machine in a single-machine environment)
spark-master : The machine that centrally manages the resources in the cluster. Master node
spark-worker : Provides the resources required to run the application, such as CPU cores memory, etc. Plays the role of a worker node in a cluster
The cluster environment uses the Hadoop cluster management system YARN. The distributed file system HDFS is mainly used as the data source for Spark. These are built on spark-master and spark-worker. In addition, spark-client is used to submit, browse, and retrieve files from HDFS.
Spark Packages
In addition to the binary community version distributed by the Apache Software Foundation, Hadoop distribution packages from vendors such as Cloudera and Hortonworks are available for Spark installation.
Using vendor packages, not only Spark, but also HDFS, YARN, and other Hadoop components can be easily installed via RPM. The vendor packages also include backported patches for bug fixes, and are based on the community version of Spark with some improvements of their own. On the other hand, since the release cycle of Spark and the release cycle of each vendor’s distribution are different, the latest version of Spark tends to be included in the package a little after the community version is released. This time, we will install the community version of Spark.
Setting up the Spark development environment
Spark supports operation on Linux, Mac, and Windows. This time, we will discuss the case using CentOS. The environment construction and operation checks will be performed by creating a general user and running on that user. For Linux, download the RPM package of the JDK for 64-bit Linux from Oracle’s web page, and install the RPM package (downloaded to /tmp) using the downloaded RPM package. Downloaded) and install using the downloaded RPM package.
After configuration is complete, confirm that the java command is available.
> java -version
java version "<JDK version>"
…
Install Spark
Next, install Spark. This procedure is performed using only spark-client. You can obtain pre-built binaries of the community version from the following page.
When Spark is used with HDFS or YARN, Spark acts as a client for them; Spark uses the HDFS and YARN client APIs internally to utilize HDFS and YARN. Binaries are required for the versions of Hadoop on which they are based. In this case, we will use the HDFS and YARN environments bundled with CDH5.4.
Since CDH5.4 is based on Hadoop 2.6, download the Spark 1.5 binary built for Hadoop 2.6 or higher.
Install the downloaded file in the /opt/spark directory.
> sudo tar zxvf /tmp/spark-1.5.0-bin-hadoop2.6.tgz -C /opt/
> cd /opt
> sudo ln -s spark-1.5.0-bin-hadoop2.6saprk
Next, set the environment variable SPARK_HOME. Here, create the file /etc/profile.d/spark/sh with user privileges and edit it as follows
export SPARK_HOME=/opt/spark
When editing is complete, reflect the settings.
> source /etc/profile
After configuration is complete, verify that spark-user can use Spark commands.
> ${SPARK_HOME}/bin/spark-submit -- version
Welcome to
………
Next, we will check the operation of Spark, which has several sample programs built into it. Among them, we will use a sample program called SparkPi, which calculates the approximate value of pi using the Monte Carlo method.
> ${SAPRK_HOME}/bin/spark-submit -- class org.apache.spark.examples.SparkPi
  ${SPARK_HOME}/lib/spark-examples-1.5.0-hadoop2.6.0.jar

Pi is roughly 3.14162
After starting, the operation check is complete when the approximate value of pi is output.
This completes the construction of an environment for running Spark on a single machine.
Additional steps for Spark cluster environments
Additional steps to build HDFS and TARN are described. We will also configure additional settings to add HDFS and YARN to the client.
HDFS is a Hadoop distributed file system. HDFS is also designed to run in a clustered environment and consists of a master node called NameNode and multiple worker nodes called DataNodes.
The NameNode is the master node of HDFS, and it can store huge data (several GB or PB) by dividing a file into blocks and distributing each block to DataNodes for storage. Compared to general file systems, the default block size is 128 MB, which is large and designed to achieve high I/O throughput for huge data.
HDFS can easily scale out I/O throughput and storage capacity by adding DataNodes, which are slave nodes. In addition, by default, blocks are stored in three DataNodes in a redundant manner, so that data is not lost even if a slave node fails.
It also manages information such as the metadata of files stored on HDFS and which DataNode manages the fragments (blocks) that divide the actual state of the stored files.
DataNode is a worker node of HDFS that manages blocks of files stored on HDFS.
Generally, DataNode and NodeManager are installed on the same machine. NameNode and ResourceManager may be installed on the same machine or on physically different machines, taking into consideration the availability and operational efficiency.
In this case, both NameNode and ResourceManager will be installed on spark-master. In addition, since spark-client accesses files to HDFS and checks the status of HDFS and YARN, we will install components for HDFS and YARN clients.
Registration of Yum repository in CDH
Use CDH Series 5.4 for installation of HDFS and YARN; register Yum repository provided by Cloudera for all machines for installation of CDH Series 5.4 packages.
Then, open the registered Yum repository configuration file (/etc/yum.repos.d/cloudera-cdh5.repo) with root privileges and edit it to refer to the CDH5.4 series repository as follows.
In order to ensure that the CDH 5.4 series repository is minimized in the subsequent installation procedure, the following command is executed.
> sudo yum clean all
This completes the registration of the Yum repository.
Building a master node
Install Name-node and ResourceManager on saprk-master. First, install NameNode as follows
> sudo yum install -y hadoop-hdfs-namenode
Then install ResourceManager.
> sudo yum install -y hadoop-yarn-resourcemanager
Building worker nodes
Next, install DataNode and NodeManager on spark-worker. First, install DataNode.
> sudo yum install -y hadoop-hdfs-datanode
Next, install NodeManager.
> sudo yum install -y hadoop-yarn-nodemanager
Building Clients
Install components to operate HDFS and YARN in the aforementioned single client, spark-client, to submit and reference files to HDFS and to manage HDFS and YARN status.
> sudo yum install -y hadoop-hdfs hadoop-yarn
Also, create spark-env.vsh in $SPARK_HOME/conf as root user and set the variable HADOOP_CONF_DIR to use HDFS.
HADOOP_CONF_DIR=/etc/hadoop/conf. ← add this sentence
HDFS and YARN environment settings and operation check
Finally, create the necessary directories, configuration files, and other environmental settings on all machines.
Edit core-site.xml, hdfs-site.xml and yarn-site.xml located under /etc/hadoop/conf as follows with root user privileges respectively.


 archive.cloudera.com
RPM-GPG-KEY-cloudera
>sudo rpm -ivh
archive.cloudera.com
RPM-GPG-KEY-cloudera
>sudo rpm -ivh


コメント