Single sign-on (SSO)
Single sign-on (SSO) is a mechanism that allows users to seamlessly access multiple different systems and applications by authenticating once to those systems and applications. This eliminates the need for users to log in to multiple systems separately and improves user convenience by allowing them to access multiple systems and applications using a single login.
The SSO mechanism is usually done through a central system (authentication server) that is responsible for authentication. When a user first logs into the authentication server, the authentication server authenticates the user and issues credentials. The user can then use the authentication information to access multiple systems and applications. Each system or application would delegate authentication to the authentication server, which would check the user’s authentication status.
The benefits of SSO include improved user convenience, simplified password management, and increased security. Users can access multiple systems with a single login, eliminating the need to remember multiple passwords. In addition, since authentication information is managed centrally, security is improved and access privileges can be managed centrally. On the other hand, if appropriate security measures are not taken, there is a risk that multiple systems can be accessed if one authentication information is compromised.
SAML(Security Assertion Markup Language)
SAML (Security Assertion Markup Language) is an XML-based standard authentication and authorization framework for web-based SSO. SAML is used as a security standard for companies and organizations to share user credentials across different domains.
SAML authentication consists of the following major components
- Service Provider (SP): The provider of the application or service that the user is trying to access.
- Identity Provider (IdP): A provider that manages a user’s credentials and verifies that the user is a legitimate user; the IdP authenticates the user and generates an XML document, called a SAML assertion, which is sent to the SP.
- User: The user of the application or service that he/she is trying to access.
The flow of SAML authentication is as follows
- When a user tries to access the SP, the SP redirects the user to the IdP.
- The IdP authenticates the user and generates a SAML assertion.
- The IdP sends the generated SAML assertion to the SP.
- SP verifies the SAML assertion and authenticates the user as a legitimate user.
- The user can then access the SP’s applications and services.
SAML has two patterns of authentication flow. (from What is SAML authentication, which is often heard in single sign-on? article)
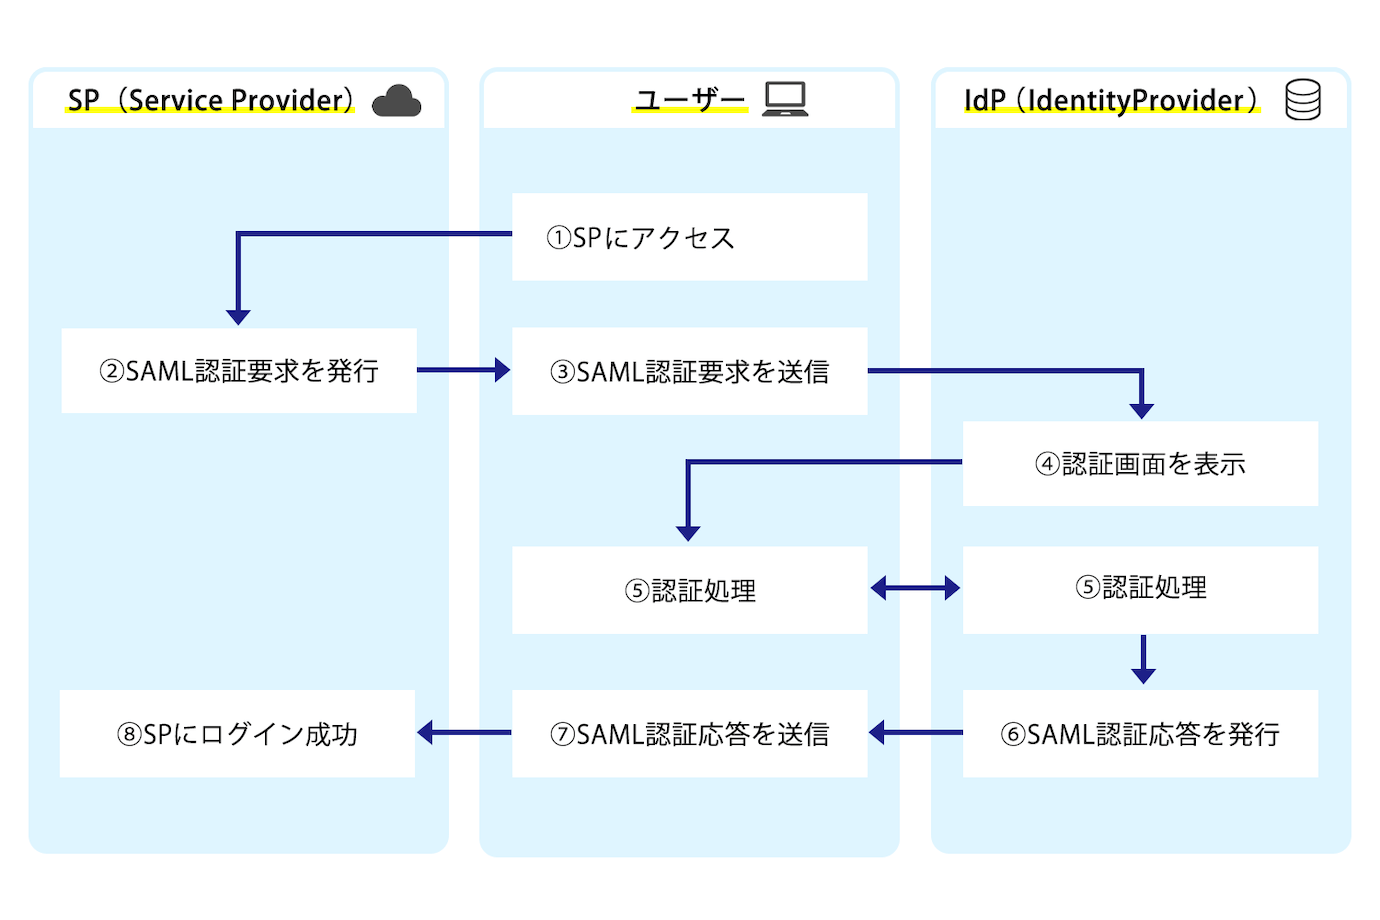
- In the case of SP Initiated, which originates from SP
-
- User accesses SP
- SP creates SAML authentication request and responds to user
- User sends SAML authentication request received from SP to IdP
- IdP authentication screen appears
- User enters login ID and password to authenticate with IdP
- If authentication is successful, the IdP issues a SAML authentication response
- The user sends the SAML authentication response received from the IdP to the SP
- When the SAML authentication response arrives at the SP, the user can log in.

- In the case of IdP Initiated, which originates from an IdP
-
- User accesses IdP
- Authentication screen of IdP is displayed
- The user enters his/her login ID and password to authenticate with the IdP.
- After successful authentication, the user can log in to the IdP
- Select the application icon (target SP) from the IdP screen
- SAML authentication response is issued by the IdP
- The user sends the SAML authentication response received from the IdP to the SP
- When the SP receives the SAML authentication response, the user can log in.

Example of SAML implementation in Python
To implement SAML using Python, the python3-saml library can be used. The following is an overview of how to implement SAML authentication using the python3-saml library.
- Install the python3-saml library. This can be installed by running pip install python3-saml.
- Add the settings for the SP (Service Provider) to the settings.py file. This includes the SP’s entity ID, certificate, private key, etc.
from saml2 import BINDING_HTTP_POST
from saml2 import entity
from saml2.config import Config
from saml2.sigver import get_xmlsec_binary

BASEDIR = "/path/to/saml/files"

config = Config()
config.load_file(f"{BASEDIR}/sp_conf.py")

sp = entity.SP(config=config)- Create an endpoint to receive SAML responses from the IdP (Identity Provider).
from flask import Flask
from flask import redirect
from flask import request
from flask import session

app = Flask(__name__)
app.secret_key = "secret_key"

@app.route("/saml/sso", methods=["POST"])
def saml_auth():
    authn_response = request.form["SAMLResponse"]
    # Verification of SAML response
    if sp.is_valid_response(authn_response, [BINDING_HTTP_POST]):
        # Processing when response is valid
        session["name_id"] = sp.get_nameid(authn_response)
        return redirect("/")
    else:
        # Handling of invalid responses
return "Invalid SAML response"- Generate SAML authentication request and redirect to IdP.
@app.route("/login")
def login():
    reqid, info = sp.prepare_for_authenticate()
    session["reqid"] = reqid
    redirect_url = None
    for key, value in info["headers"]:
        if key == "Location":
            redirect_url = value
            break
    return redirect(redirect_url)
When SAML is used in a real application, various security considerations must be taken into account, so adequate testing and security measures must be taken.
Implementing SAML in Clojure
The clj-saml library can be used to implement SAML in Clojure. The following is an overview of how to implement SAML authentication using the clj-saml library.
- Add the clj-saml library as a dependency to your project. This can be done by adding the following dependency to the project.clj file
[clj-saml "0.5.0"]- Create a configuration for the SP (Service Provider). This includes the SP’s entity ID, certificate, private key, etc.
(ns myapp.saml
  (:require [clj-saml.core :as saml]))

(def sp-settings
  {:entity-id "https://sp.example.com/metadata"
   :private-key "/path/to/sp-key.pem"
   :certificate "/path/to/sp-cert.pem"
   :acs-url "https://sp.example.com/acs"
   :single-logout-url "https://sp.example.com/logout"
   :nameid-format "urn:oasis:names:tc:SAML:1.1:nameid-format:unspecified"
:force-authn false})- Create an endpoint to receive SAML responses from the IdP (Identity Provider).
(ns myapp.routes
  (:require [clj-saml.core :as saml]
            [ring.util.response :refer [redirect]]
            [ring.util.session :refer [update-session! get-session]]))

(defn saml-auth [request]
  (let [authn-response (-> request :params :SAMLResponse)
        session (get-session request)]
    ;; Verification of SAML response
    (if (saml/valid-response? sp-settings authn-response)
      ;; Processing if response is valid
      (do (update-session! session assoc :name-id (saml/get-nameid authn-response))
          (redirect "/"))
      ;; Handling of invalid responses
(str "Invalid SAML response"))))- Generate SAML authentication request and redirect to IdP.
(ns myapp.routes
  (:require [clj-saml.core :as saml]
            [ring.util.response :refer [redirect]]
            [ring.util.session :refer [update-session! get-session]]))

(defn saml-login [request]
  (let [session (get-session request)
        authn-request (saml/authn-request sp-settings)]
    ;; Save AuthnRequest to session
    (update-session! session assoc :authn-request authn-request)
    ;; Redirect to IdP
    (redirect (saml/get-authn-request-url sp-settings authn-request))))
OAuth(Open Authorization)
OAuth (Open Authorization) will be an open standard protocol for authorization between different applications. OAuth is used to obtain authorization for a user to access the resources of one service (resource owner) on behalf of another service (client).
Typically, OAuth is used to secure resources such as Web APIs and grant access to other applications in a secure manner. For example, OAuth is used when a user logs into an application using his/her Twitter account and the application obtains authorization to access the user’s Twitter account on his/her behalf.
OAuth issues a token, called an access token, through the authorization process, which allows the client to access the resource owner’s resources. It is widely used on many platforms.
The main advantages of OAuth are that it allows access to resources in a secure manner without sharing user credentials with third-party applications, allows fine scoping to control privileges, and provides a strong mechanism for protecting user privacy at the point of This is the point that provides a strong mechanism for protecting user privacy.
Example of OAuth implementation in Python
The requests-oauthlib library can be used to implement OAuth in Python. The following are the basic steps to implement OAuth authentication using the requests-oauthlib library.
- Install the requests-oauthlib library.
pip install requests requests-oauthlib- Obtain the information required for OAuth authentication. This includes the client ID, client secret, authorization endpoint, access token endpoint, and redirect URL provided by the OAuth service provider.
- Create an OAuth2Session object. This includes client_id, client_secret, redirect_uri, scope, etc.
from requests_oauthlib import OAuth2Session

client_id = 'your-client-id'
client_secret = 'your-client-secret'
redirect_uri = 'http://localhost:8000/callback'
scope = ['scope1', 'scope2']

oauth = OAuth2Session(client_id, redirect_uri=redirect_uri, scope=scope)- Retrieve the authorization URL and redirect the user to the OAuth service provider’s authentication screen.
authorization_url, state = oauth.authorization_url(authorization_endpoint)

print('Please go to %s and authorize access.' % authorization_url)

authorization_response = input('Enter the full callback URL: ')- Obtain an access token from the callback URL redirected from the authentication screen.
token = oauth.fetch_token(
    token_endpoint,
    authorization_response=authorization_response,
    client_secret=client_secret
)
In practice, each OAuth service provider has different specifications, so a more detailed implementation may be required.
OAuth implementation in Clojure
In the previous article “Security in Microservices – Clojure API with Auth and Pedestal“, a concrete implementation of OAuth using Clojure’s Pedestal was described. Here we describe a simpler form.
To implement OAuth in Clojure, the clj-oauth library can be used. The following is a basic procedure for implementing OAuth authentication using the clj-oauth library.
- Add the clj-oauth library to the dependencies. Add the following line to project.clj
[clj-oauth "1.6.0"]
- Obtain the information required for OAuth authentication. This includes the client ID, client secret, authorization endpoint, access token endpoint, and redirect URL provided by the OAuth service provider.
- Create an OAuth client. This includes the information provided by the OAuth service provider and uses the oauth-client macro in the clj-oauth library.
(require '[clj-oauth.client :as client])

(def oauth-client
  (client/oauth-client
    {:client-id "your-client-id"
     :client-secret "your-client-secret"
     :auth-url "https://oauth.example.com/authorize"
     :token-url "https://oauth.example.com/token"
:redirect-uri "http://localhost:8000/callback"}))- Retrieve the authorization URL and redirect the user to the OAuth service provider’s authentication screen.
(require '[clj-oauth.core :as oauth])

(def authorization-url
  (oauth/authorization-url
    oauth-client
    {:state "some-state-param"
     :scope "scope1,scope2"}))

(println "Please go to " authorization-url " and authorize access.")- Obtain an access token from the callback URL redirected from the authentication screen.
(def access-token
  (oauth/fetch-access-token
    oauth-client
    {:grant-type :authorization-code
     :code "authorization-code"
     :redirect-uri "http://localhost:8000/callback"}))
reference book
General reference books include “Creating with ‘Auth0’! Single Page Application with Authentication” etc.
Using this book, you can create an Auth authentication implementation for a simple web page. The contents are as follows
Creating with "Auth0"! Authenticated Single Page Application Takahiro Tsuchiya
	Chapter 1 Web Applications and Authentication
		1.1 Monolithic Applications
		1.2 Monolithic Applications and Cookie Authentication
		1.3 Mobile Applications and Token Authentication
		1.4 SPA and Authentication
		1.5 Modern Application Composition and IdP
	Chapter 2: Fundamentals of Token-Based Authentication
		2.1 Authentication and Authorization
		2.2 OAuth2
		2.3 OpenID Connect (OIDC)
	Chapter 3 JSON Web Token
		3.1 What is JWT?
		3.2 Where to use JWT
		3.3 Structure of JWT
		3.4 Cryptographic Algorithms
		3.5 Requests to the API
		3.6 Where to store tokens
		3.7 JWTHandbook
	Chapter 4 Auth0
		4.1 What is Auth0?
		4.2 What's good about Auth0
		4.3 Name Authorization
		4.4 Anxiety about Throwing Authentication
		4.5 Using Auth0
	Chapter 5. SPA created with Nuxt
		5.1 What is Nuxt.js?
		5.2 Let's try using Nuxt.js
		5.3 Build
	Chapter 6 Incorporating Auth0 into Nuxt
		6.1 Two types of libraries
		6.2 Incorporating Lock
		6.3 Managing Tokens
		6.4 Determining Login Status
		6.5 Accessing the Auth0API
	Chapter 7. Coexisting with Nuxt and Rails
		7.1 Managing with a single repository
		7.2 Changing the directory structure
		7.3 Rails build environment
		7.4 Rails New
		7.5 Creating an API
		7.6 Changing the Nuxt Output Destination
		7.7 Setting up Proxy during development
		7.8 Checking Proxy Operation
	Chapter 8 Authentication with Rails and Knock
		8.1 What is Knock?
		8.2 Introducing Knock
		8.3 Key Setup
		8.4 Creating a User
		8.5 Creating an authenticated controller
		8.6 Directly accessing APIs that require authentication
		8.7 Calling APIs from Nuxt
	Chapter 9 Production Build and Deployment
		9.1 Switching databases
		9.2 Production Build
		9.3 Auth0 security settings
		9.4 Setting up API Keys for Social Accounts
	Chapter 10 Customizing Configuration
		10.1 Allow multiple social account logins
		10.2 Disable Password Login
		10.3 Restrict Login by Email Address
		10.4 Implement name matching
		10.5 Update Tokens
	At the end
Difference between SAML and OAuth
SAML authentication and OAuth are the same in terms of achieving single sign-on, but the key to understanding the difference between the two is the difference between “authentication” and “authorization. SAML authentication involves both authentication and authorization, while OAuth, in principle, does not involve authentication but only authorization. In other words, OAuth does not perform authentication when using APIs, which is a major difference from SAML authentication.
To be more specific, the main difference between SAML and OAuth is the purpose of use and the design of the protocol: SAML is an XML-based authentication protocol for authentication and authorization between different domains, and is primarily intended for SSO and reliable authentication between organizations. OAuth, on the other hand, is a protocol to provide authorization between different applications, and is primarily targeted at protecting resources such as Web APIs and granting access to other applications in a secure manner.

コメント